How to Generate ChatGPT Meeting Notes Step by Step

Get the work done for any meeting
Meeting transcription, AI custom notes, CRM/ATS integration, and more
Good notes are key to keeping everyone on the same page after a meeting.
Why not leverage Gen AI tools to share automated summaries of your meetings ?
In this article, we’ll explore how to use ChatGPT to generate notes step by step.
How to Generate Meeting Notes with ChatGPT
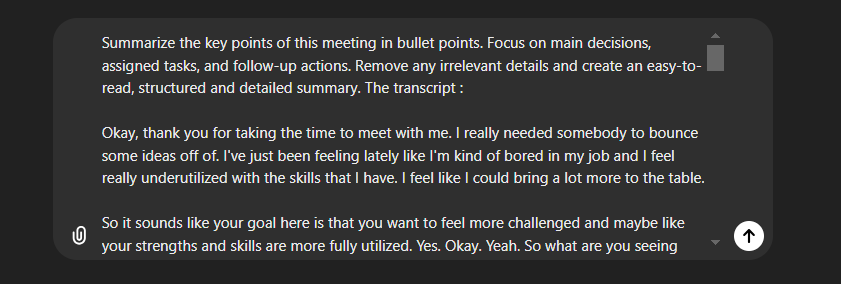
ChatGPT can help you summarise the transcription of your meeting (but not transcribe it). Let’s walk through the step-by-step process :
Step 1: Record and Transcribe your Meeting Audio
The first thing you need is to record your meeting. You can easily do this on Google Meet, Microsoft Teams or Zoom by enabling recording and transcription. Make sure your files are accessible and in a format that ChatGPT or related transcription tools can work with, like MP3 or WAV. This ensures that you can easily upload or share them when you’re ready to transcribe.
ChatGPT won't be able to transcribe your audio directly. You'll have to use OpenAI Whisper on the API interface). So it just better that you get direcly the transcription from your videoconferencing tool.
Step 2: Use ChatGPT to Generate the Meeting Summary
With your transcription ready, you can now use ChatGPT to generate the actual meeting notes. Copy the transcribed text and input it into ChatGPT. The trick here is to provide a clear and specific prompt so that the generated summary is both relevant and actionable. A good prompt might be something like:
Summarize the key points of this meeting in bullet points. Focus on main decisions, assigned tasks, and follow-up actions. Remove any irrelevant details and create an easy-to-read, detailed and structured summary. The transcript : [insert your transcript here].
Step 3: Review and Edit the Summary
Once ChatGPT has generated the summary, take a moment to review it. While the AI is powerful, it may need a bit of human oversight to ensure that the summary is 100% accurate and captures the right tone. Look for any important points that may have been missed or areas where the AI-generated text could be clearer.
Step 4: Format and Share the Notes
After finalizing the summary, it’s time to format and share it. You might want to use bullet points for clarity, categorize the notes by topics (e.g., action items, decisions, follow-ups), or add emphasis to certain sections. Tools like Google Docs or Microsoft Word can help you add structure to the notes, making them easy to read and share.
How to Use an Automated Note-Taker Tool: Noota
.webp)
Noota is an advanced AI-powered meeting note-taker that takes the hassle out of capturing and managing meeting notes :
Step 1: Set Up Automated Recording and Transcription
Noota makes it easy to record and transcribe your meetings in real time. Start by connecting Noota to your preferred video conferencing tool, such as Zoom or Microsoft Teams. This integration allows Noota to automatically start recording as soon as the meeting begins. You can also manually start a recording if needed.
Once the recording begins, Noota transcribes the conversation in real time. This feature eliminates the need for taking frantic notes during the meeting, allowing you to focus fully on the discussion. The transcription is highly accurate, capturing every detail of what was said.
Step 2: Customize Note Templates
One of the standout features of Noota is its customizable templates. You can select from a variety of pre-made templates designed for different types of meetings, such as project updates, one-on-one meetings, or committee discussions. These templates help ensure that all relevant information is captured in an organized manner.
To get started, choose the template that best fits your meeting type. You can customize it by adding sections that are specific to your needs, like action items or important deadlines. This level of customization ensures that your meeting notes are tailored to your team’s specific goals and workflows.
Step 3: Review and Edit the Notes
After your meeting, Noota will provide a detailed transcript along with a summarized version based on your chosen template. While the AI is effective, it’s always a good idea to review the notes to ensure all important points are correctly captured. This is your opportunity to refine the language or add extra context where needed, making the notes more actionable.
Step 4: Share Notes with Your Team
Noota makes sharing your meeting notes incredibly simple. Once you’ve reviewed and finalized the notes, you can distribute them with just a click. You can share them directly through email or send them to team collaboration tools like Slack. This helps ensure that everyone—whether they attended the meeting or not—is up to date on decisions, tasks, and next steps.
Step 5: Integrate with Other Productivity Tools
Noota integrates seamlessly with several productivity tools like Slack, CRMs, and ATSs (Applicant Tracking Systems). These integrations help you fit Noota into your existing workflow without any disruptions. For instance, you can link Noota with your CRM to automatically log meeting notes and follow-up actions related to clients or sales prospects.
You can also generate documents or marketing content straight from the notes with the right ChaGPT prompts.
Want to generate structured and detailed notes from your meetings automatically ? Try Noota for free.
Get the work done for any meeting
Meeting transcription, AI custom notes, CRM/ATS integration, and more
Related articles
Forget note-taking and
try Noota now
FAQ
In the first case, you can directly activate recording as soon as you join a videoconference.
In the second case, you can add a bot to your videoconference, which will record everything.
Noota also enables you to translate your files into over 30 languages.

.svg)
.svg)
.webp)
.png)
.svg)
