You’ve just finished a Zoom meeting. Now what? Do you waste hours rewatching the recording, manually trimming unnecessary parts, and struggling to extract key points? Or worse—do you let the recording sit untouched in a folder, never to be used again?
Editing Zoom recordings is essential for streamlining communication, extracting valuable insights, and sharing key takeaways with your team. But without the right tools, it can be a time-consuming nightmare. Manually sifting through hours of footage isn't just frustrating—it’s inefficient.
Thankfully, there are smarter ways to edit Zoom recordings. Whether you need quick trims using Zoom’s built-in features, advanced editing on PC, Mac, or mobile, or AI-powered automation with Noota, this guide will show you how to transform your Zoom recordings into polished, structured, and actionable content.
Here’s what you’ll learn how to edit a Zoom recording using Zoom’s built-in trimming tools How to edit a Zoom recording on PC or Mac with external software How to edit Zoom recordings directly from your mobile device
How to Edit a Recording with Zoom's Built-in Features
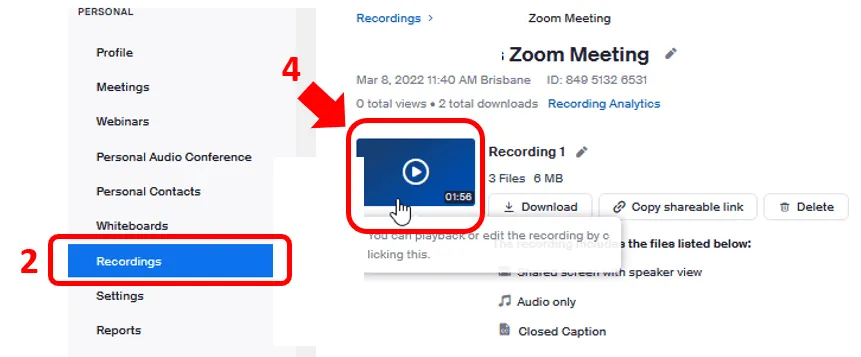
Zoom offers basic editing tools for trimming recorded meetings, but its features are quite limited. These only work for cloud recordings. So if you recorded your meeting locally on your computer, you won’t have access to these trimming features inside Zoom. To access the editing tools:
- Sign in to your Zoom account via a web browser.
- Go to "Recordings" in the navigation menu.
- Select the meeting recording you want to edit.
- Click "Play" on the video.
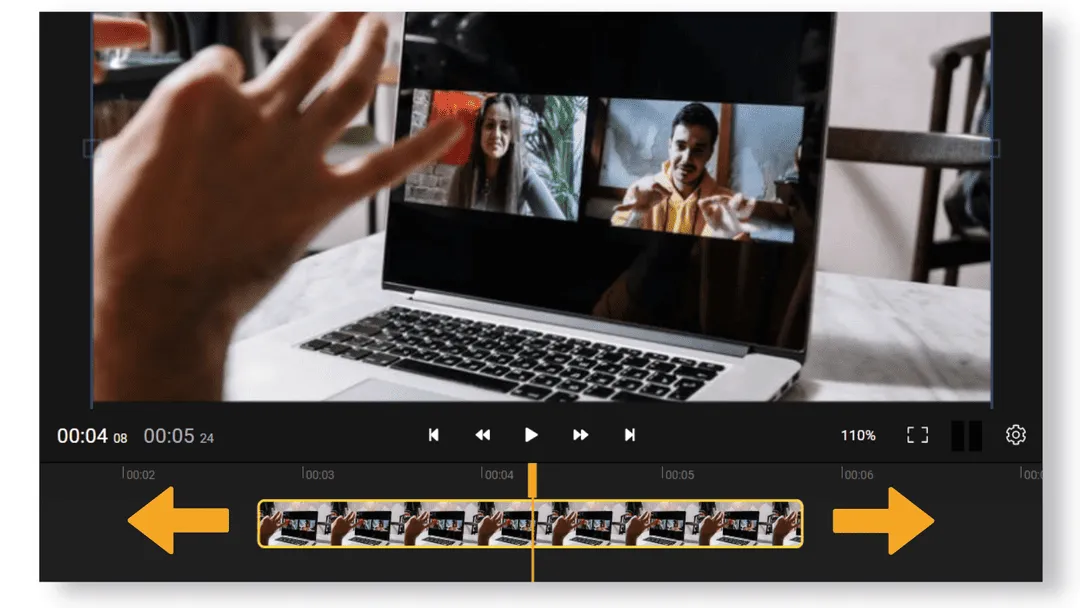
- Click the Scissors icon (trim tool) in the player controls.
Zoom allows you to remove unwanted portions at the start and end of a cloud recording. Here’s how:
- Once inside the video player, click the Trim icon.
- Drag the handles on the timeline to set your desired start and end points.
- Click "Save" to apply the changes.
This feature is useful for cutting out small gaps, such as the few seconds before a meeting officially starts or any dead space at the end.
How to Edit a Zoom Recording on PC/Mac
Zoom’s built-in editing features are limited, which means most users will need an external video editor to refine their recordings. Below, we’ll walk through the best tools and methods for editing a Zoom recording on both Windows and macOS.
1. Locating Your Zoom Recordings
Before you begin editing, you need to find where Zoom saves your recordings.
- For Cloud Recordings:
- Sign in to Zoom on a web browser.
- Click "Recordings" in the left menu.
- Download the recording file to your computer.
- For Local Recordings:
- Open the Zoom app on your PC or Mac.
- Click "Meetings" > "Recorded" to see your saved recordings.
- Click "Open" to access the folder containing the files.
By default, Zoom saves recordings in MP4 format, making them compatible with most video editing software.
2. Editing a Zoom Recording on Windows
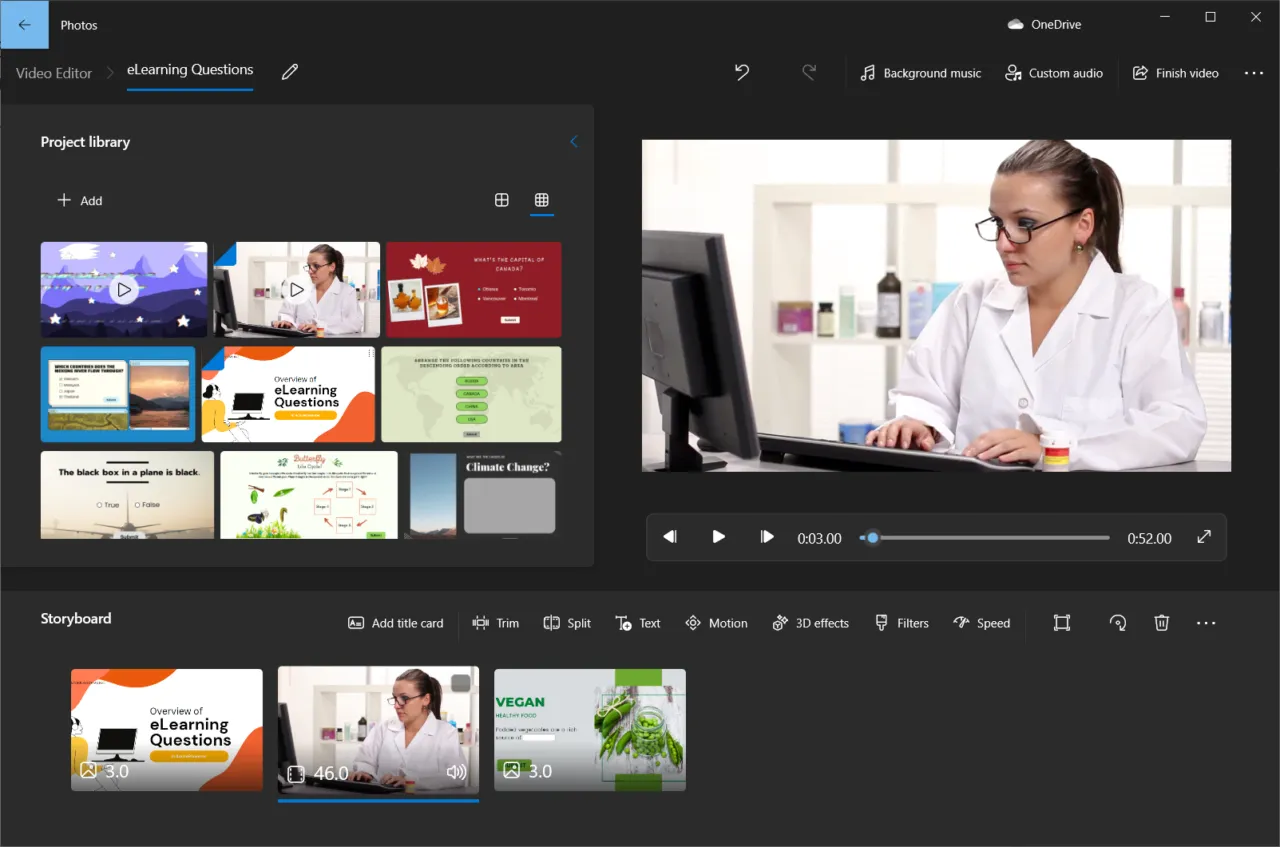
Using the Built-in Video Editor (Windows 10 & 11)
Windows has a free built-in editor called Photos that allows for basic trimming and clipping.
- Open the Photos app and go to "Video Editor" mode.
- Click "New Project", then import your Zoom recording.
- Drag your video to the timeline and use the "Trim" tool to cut unwanted sections.
- Add text, transitions, or background music if needed.
- Click "Finish Video" and export it in your preferred resolution.
While this method works for simple edits, it lacks advanced features like multi-track editing or noise reduction.
Using Advanced Software (Adobe Premiere Pro or DaVinci Resolve)
For more professional edits, consider Adobe Premiere Pro or DaVinci Resolve:
- Adobe Premiere Pro (Paid): Industry-leading software with powerful tools for cutting, transitions, and adding overlays.
- DaVinci Resolve (Free & Paid): A great free alternative with excellent color correction and audio enhancement features.
3. Editing a Zoom Recording on Mac
Using iMovie (Free for macOS)
iMovie is a great option for Mac users who need quick but effective video editing.
- Open iMovie and create a new project.
- Drag your Zoom recording into the timeline.
- Use the Trim tool to remove unnecessary parts.
- Add titles, background music, or voiceovers.
- Export the final version in MP4, MOV, or other formats.
iMovie is user-friendly but lacks advanced editing options.
Using Final Cut Pro (Advanced Editing)
For those needing more control, Final Cut Pro is a powerful Mac-exclusive tool. It offers:
- Multi-layer video editing.
- Advanced audio balancing.
- High-quality motion graphics.
While Final Cut Pro is a paid option, it’s an excellent choice for professional edits.
How to Edit a Zoom Recording on Mobile
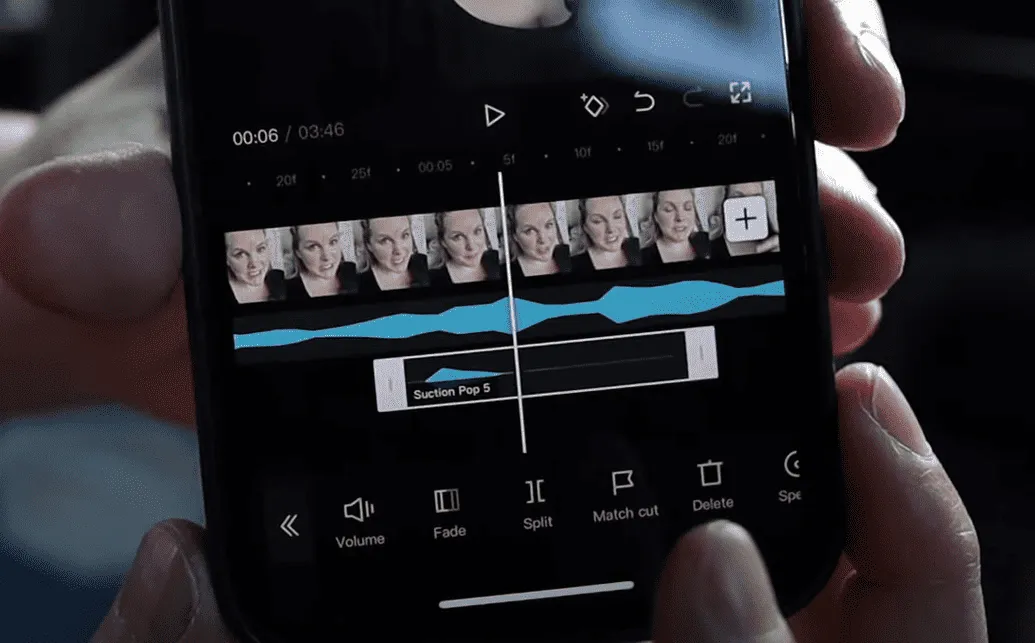
Whether you’re using an iPhone or Android, here’s how to edit your Zoom recordings directly from your mobile device.
1. Locating Your Zoom Recording on Mobile
Before you can edit your Zoom recording, you need to find where it is stored.
- For Cloud Recordings:
- Open the Zoom app on your phone.
- Go to "Meetings" > "Recorded" to access cloud recordings.
- Download the video to your phone’s storage.
- For Local Recordings (on Mobile or External Storage):
- If you recorded using Zoom’s local option (via desktop), transfer the file to your phone using Google Drive, Dropbox, or AirDrop (for iPhone users).
- If using a USB-C to phone adapter, you can transfer the file directly from a laptop to your phone’s internal storage.
Once you have the file on your phone, you’re ready to start editing.
2. Editing a Zoom Recording on iPhone
Using iMovie (Free, iOS Only)
iMovie is Apple’s built-in video editor that provides quick trimming and basic editing tools.
- Open iMovie and create a new project.
- Import your Zoom recording from your Photos app or Files folder.
- Use the Trim tool to cut out unnecessary parts.
- Add text, filters, or transitions if needed.
- Tap "Export" to save or share the edited video.
Pros:
✅ Free and built into iOS
✅ Simple trimming and transition tools
Cons:
❌ Lacks advanced editing features like multi-layer video editing
❌ Limited text overlay customization
Using CapCut (Free, iOS & Android)
CapCut is a great mobile editor with more advanced features than iMovie.
- Open CapCut and create a new project.
- Import the Zoom recording from your phone’s storage.
- Use the Split tool to remove unwanted sections.
- Add background music, subtitles, and effects.
- Export in HD or 4K resolution.
3. Editing a Zoom Recording on Android
Using InShot (Free & Paid, Android & iOS)
InShot is a popular mobile editor that allows you to quickly trim and edit videos.
- Open InShot and select "Video".
- Import your Zoom recording from Google Photos or local storage.
- Use the Cut tool to remove unnecessary parts.
- Adjust brightness, contrast, and background noise if needed.
- Save the final version in MP4 format.
Pros:
✅ Easy to use for beginners
✅ Available for both Android and iOS
Cons:
❌ Free version has watermark
❌ Limited professional-level editing tools
Using Kinemaster (Advanced Editing for Android & iOS)
For those who need more control, Kinemaster offers a full suite of editing tools.
- Import your Zoom recording into the timeline.
- Use the multi-layer feature to add overlays and annotations.
- Adjust audio levels to enhance voice clarity.
- Export the video in HD or 4K resolution for professional use.
How to Edit a Zoom Recording with AI: Noota
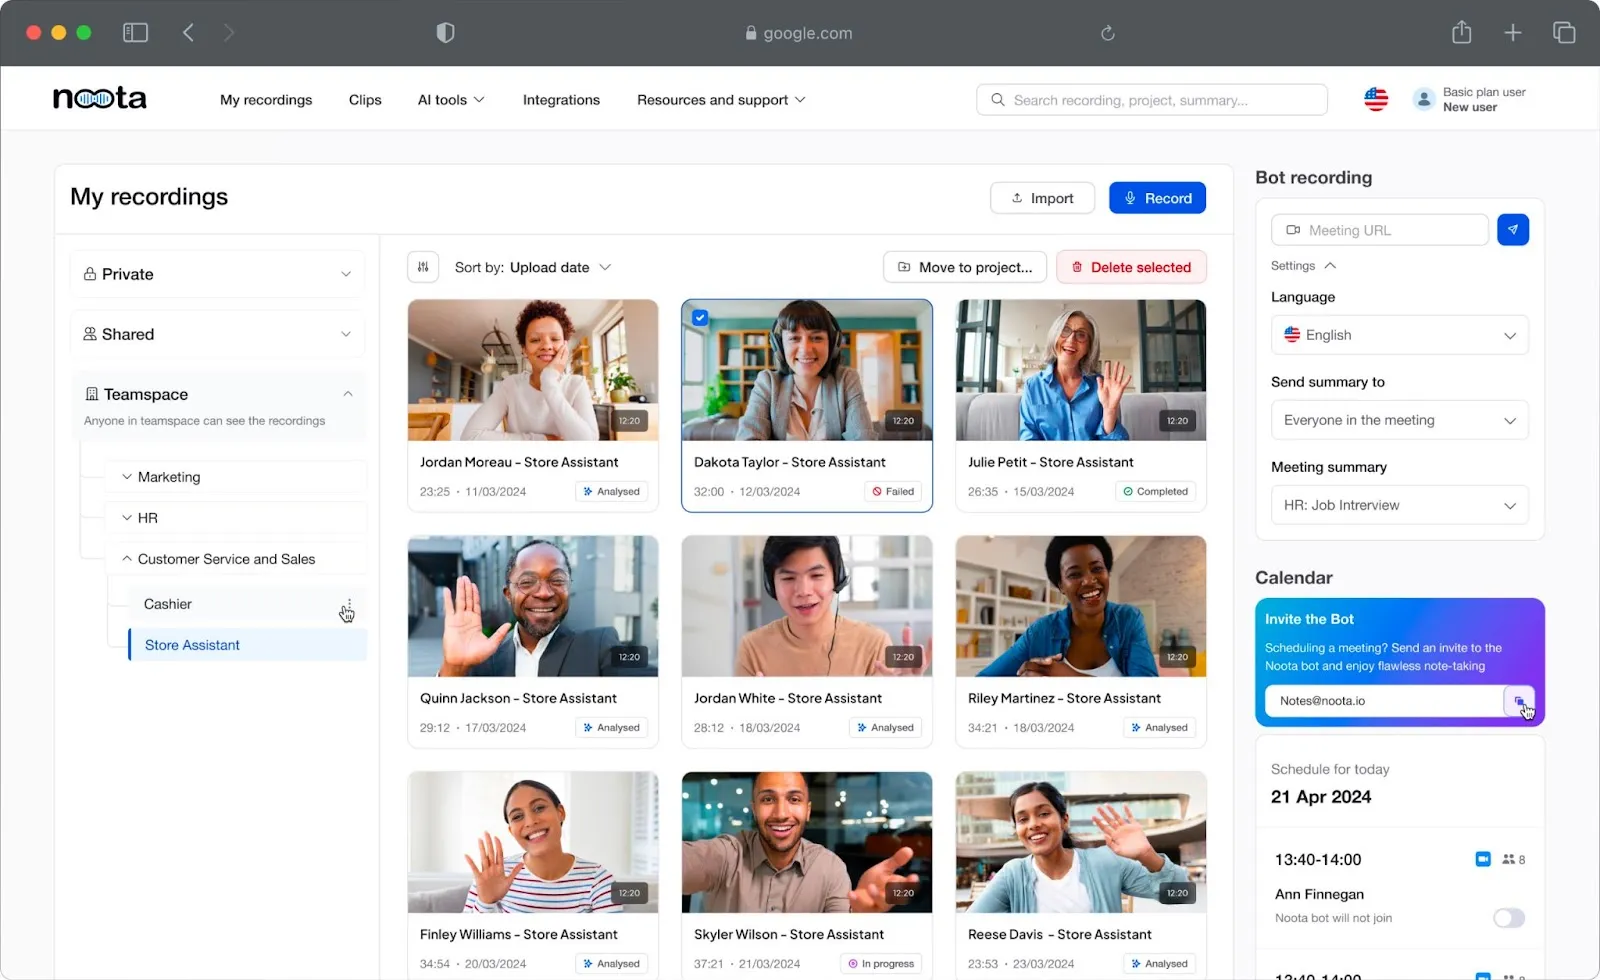
Traditional video editing takes time. Cutting clips, refining content, and extracting key moments manually can be tedious. But what if AI could automate the process for you? Noota’s AI-powered technology transforms Zoom recordings into refined, structured, and actionable content :
1. Upload Your Zoom Recording to Noota
Before Noota can process your recording, you need to upload it:
- Log in to your Noota account.
- Click “Upload” and select your Zoom recording from your computer or cloud storage.
- Noota will automatically process the file, converting speech into text and detecting key moments.
Once uploaded, the AI will analyze the content, identifying key topics, action items, and highlights.
2. Generate Automatic Transcriptions
One of Noota’s standout features is its real-time transcription. Instead of manually scrubbing through your video to find important discussions, Noota provides a fully searchable transcript.
- Automatic Speaker Identification: Noota detects different speakers and organizes the conversation into clear, structured text.
- Timestamped Transcripts: Every line of dialogue is linked to its exact moment in the video, making it easy to locate key parts.
- Editable Text: Need to fix errors? The AI-generated transcript can be edited and refined before exporting.
With the transcription complete, you can quickly extract key insights, remove unnecessary dialogue, or create text-based summaries without watching the entire recording.
3. Create Smart Video Clips with AI
Instead of manually cutting your video, Noota automatically selects important segments based on content analysis.
- Predefined Templates: Choose from AI-generated templates tailored for meetings, presentations, or client calls.
- Highlight Extraction: Noota pinpoints moments with actionable insights—such as decisions made, follow-ups, or critical discussions.
- Clip Customization: Adjust the start and end times, add text overlays, or include background music for a polished final product.
Whether you need a short highlights reel or an edited presentation, Noota saves you hours of manual work.
4. Convert Recordings into Actionable Documents
Meetings shouldn’t just end with a video. Noota transforms your Zoom recordings into actionable content, allowing you to:
- Generate meeting summaries: AI extracts key points and organizes them into a structured document.
- Create automatic reports: Turn spoken discussions into written insights for team distribution.
- Automate follow-up emails: Noota drafts personalized emails based on the meeting content, saving you time on post-meeting communication.
Want to manage your Zoom recording efficiently ? Try Noota for free now.

.png)

.webp)


.svg)
.svg)
.svg)