Recording your Webex meetings is useful, but pairing them with transcriptions takes things to the next level.
You can revisit decisions, track action items, and share key takeaways with your team—without rewatching the full video.
In this guide, you’ll learn how to transcribe your Webex meetings step by step with the built-in transcription but also using other tools tu get an AI report.
Does Webex have a built-in transcription feature?
Yes, Webex offers automatic transcription. It works with cloud recordings saved in MP4 format. Once activated, every recorded meeting will come with a transcript.
The transcript shows up next to the video during playback. You can scroll through it and click on any part to jump to that moment in the meeting. This makes it easy to review what was said and when.
It’s available only in English for now. If your meeting is in another language, the feature won’t work. Also, this feature is only available if your Webex plan includes it. Not all users have access by default.
To use it, you need to make sure transcription is turned on. In most cases, your Webex admin must enable it for your organization. If you’re not seeing the option, check with them.
How to transcribe a recording on Webex
Transcribing a Webex meeting only works with cloud recordings in MP4 format. Here's how to do it, step by step.
Step 1: Check if transcription is enabled
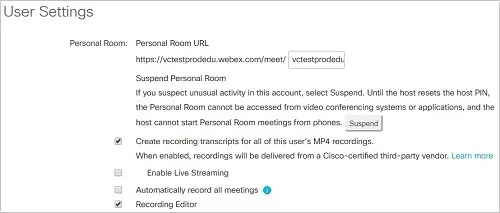
Before you start recording, make sure transcription is turned on in your Webex account.
- Log in to your Webex account.
- Go to Preferences > Recording.
- Find the option “Create recording transcripts for all my MP4 recordings.”
- Turn it on.
If you don’t see this option, your administrator might need to enable it for your organization. In that case, reach out to your IT team or Webex admin.
Step 2: Record your Webex meeting
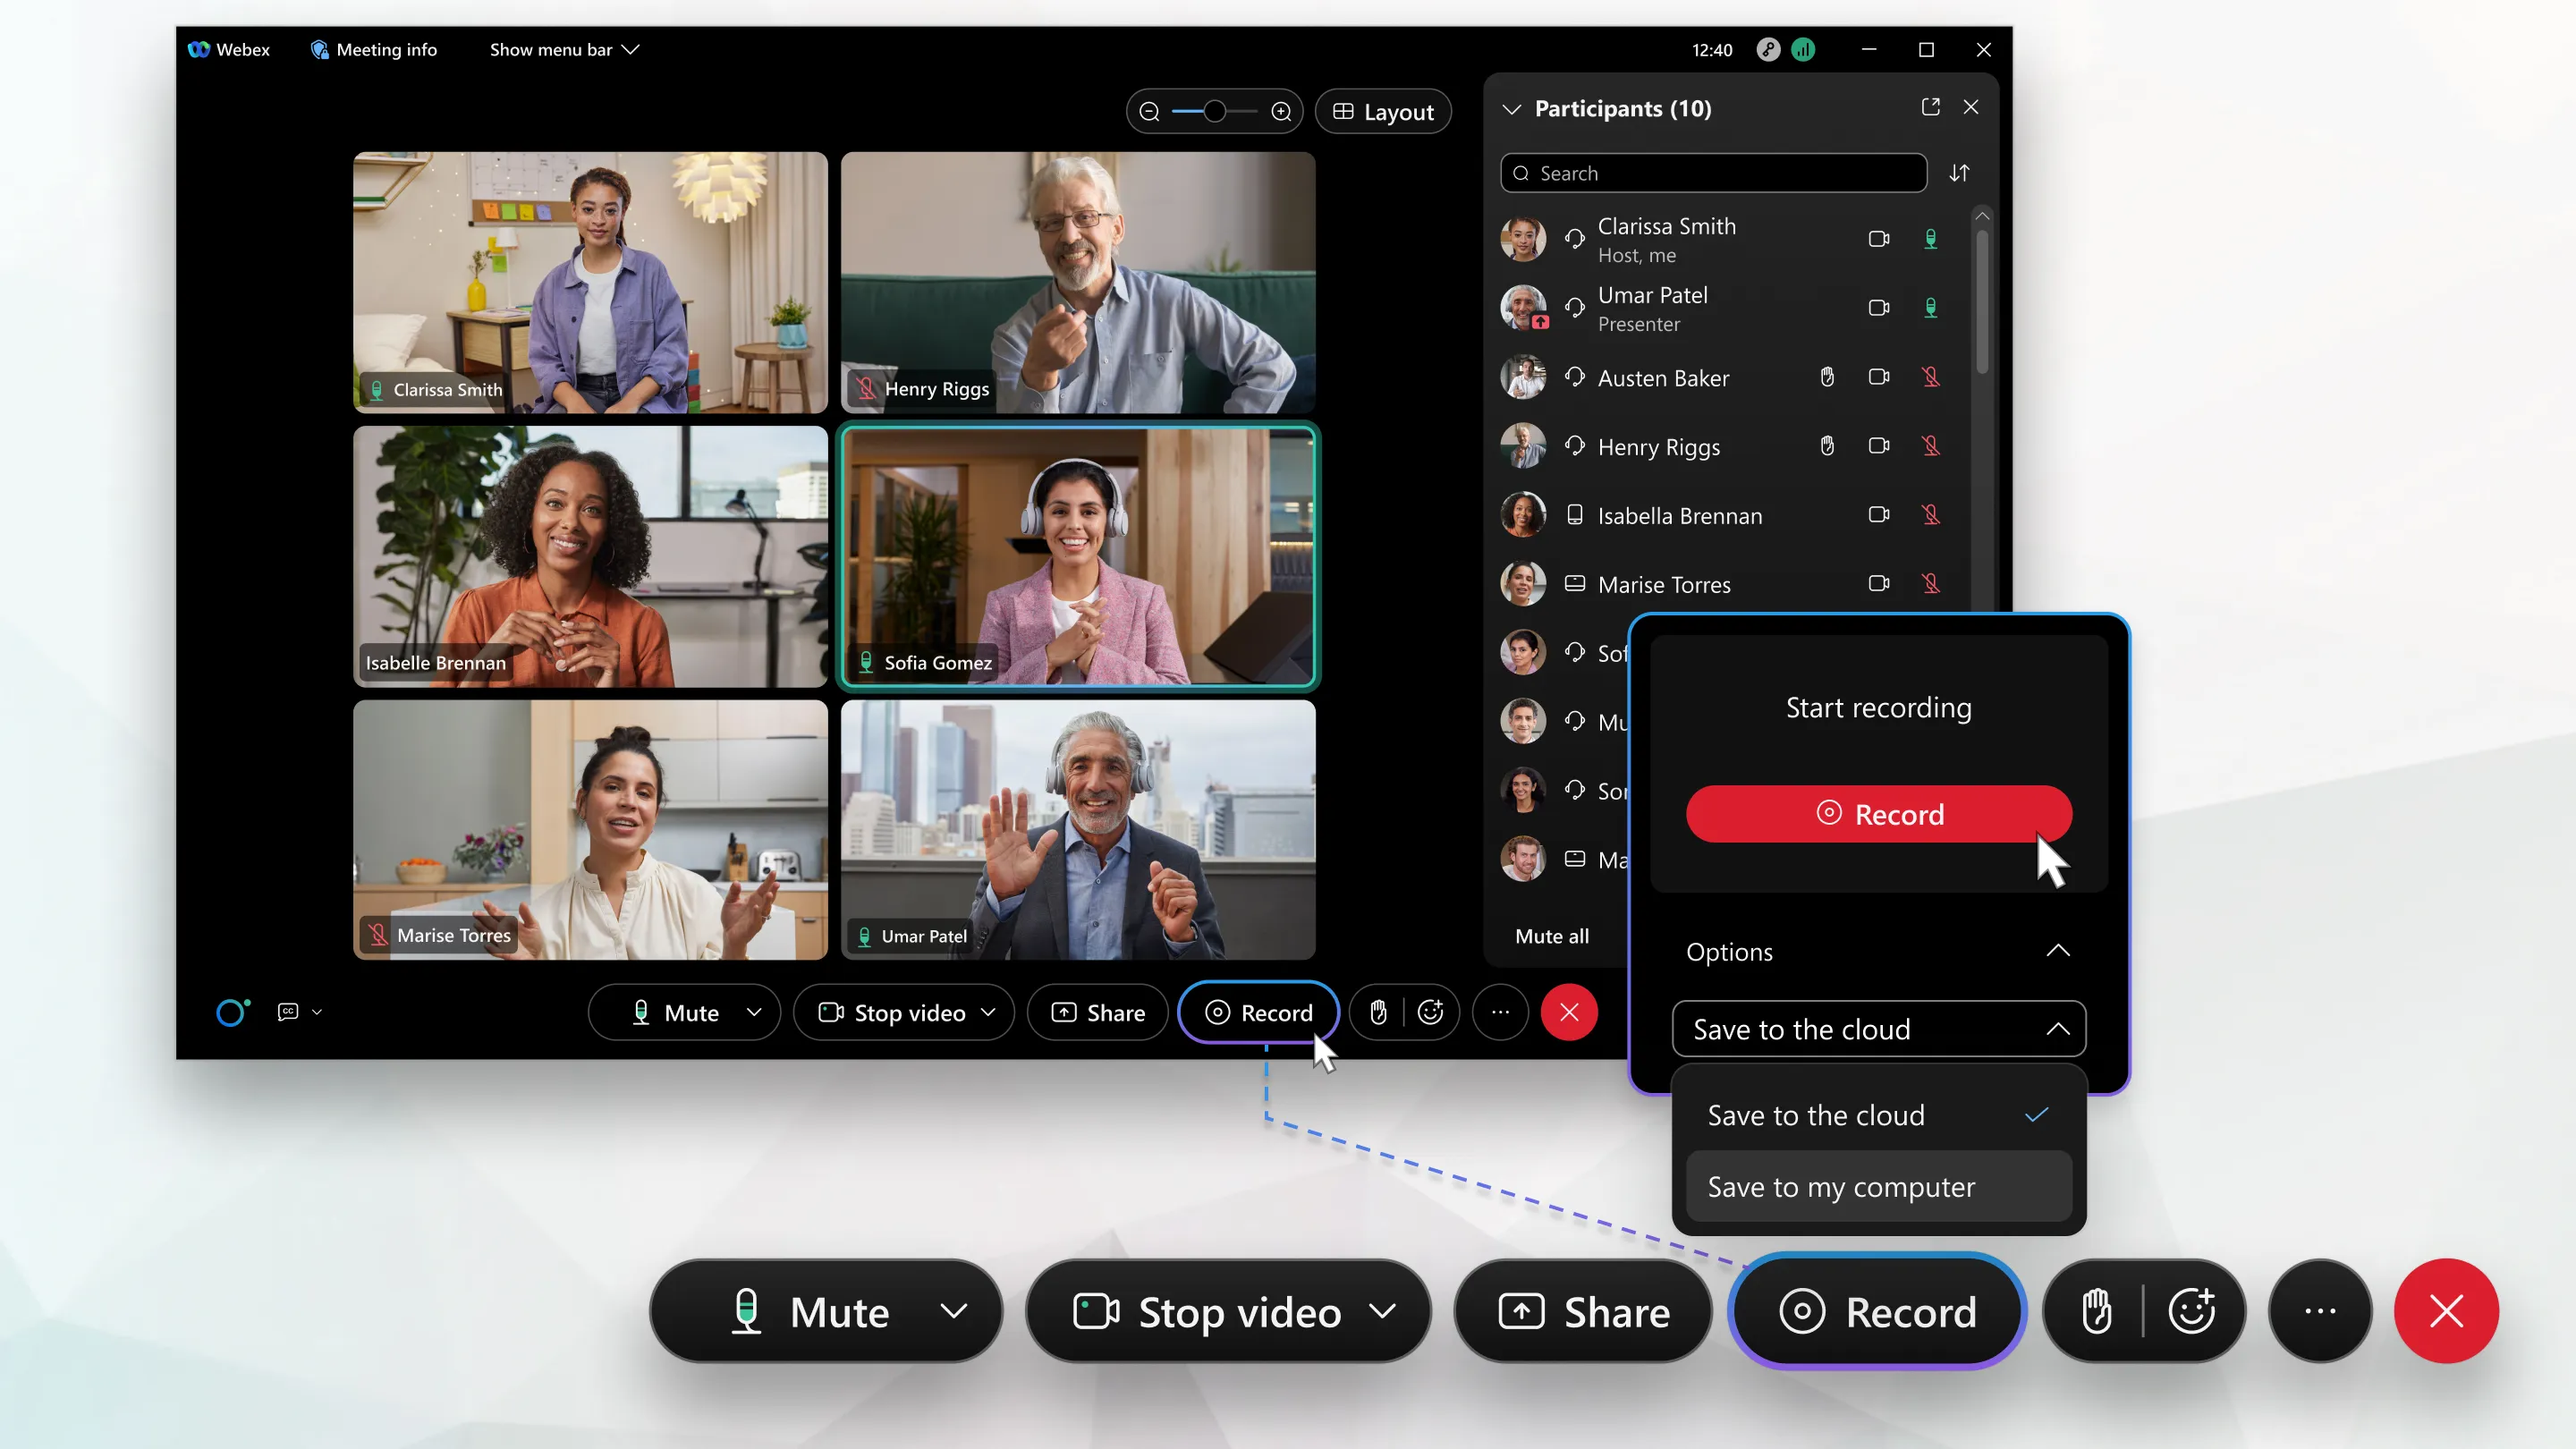
Once transcription is enabled, you can record your meeting as usual.
- Start your Webex meeting.
- Click the Record button at the bottom of your screen.
- Choose to save the recording to the cloud.
Transcriptions are only available for cloud recordings. If you save the file locally, you won’t get a transcript.
Step 3: Wait for the recording to process
After your meeting ends, Webex will start processing the video and the transcript. This usually takes a few minutes. Longer meetings may take more time.
In most cases, your transcript will be ready in about twice the length of your meeting. For example, a 30-minute meeting may take up to an hour to process.
Step 4: Access your recording and transcript
Once processing is complete, go to your Webex Recordings page.
- Log in to your Webex account.
- Click on your profile picture and go to Recordings.
- Find the meeting you just recorded.
- Click on it to open the playback page.
You’ll see the transcript on the right side of the video. As the video plays, the transcript scrolls automatically and highlights the text in real time.
Step 5: Use the transcript
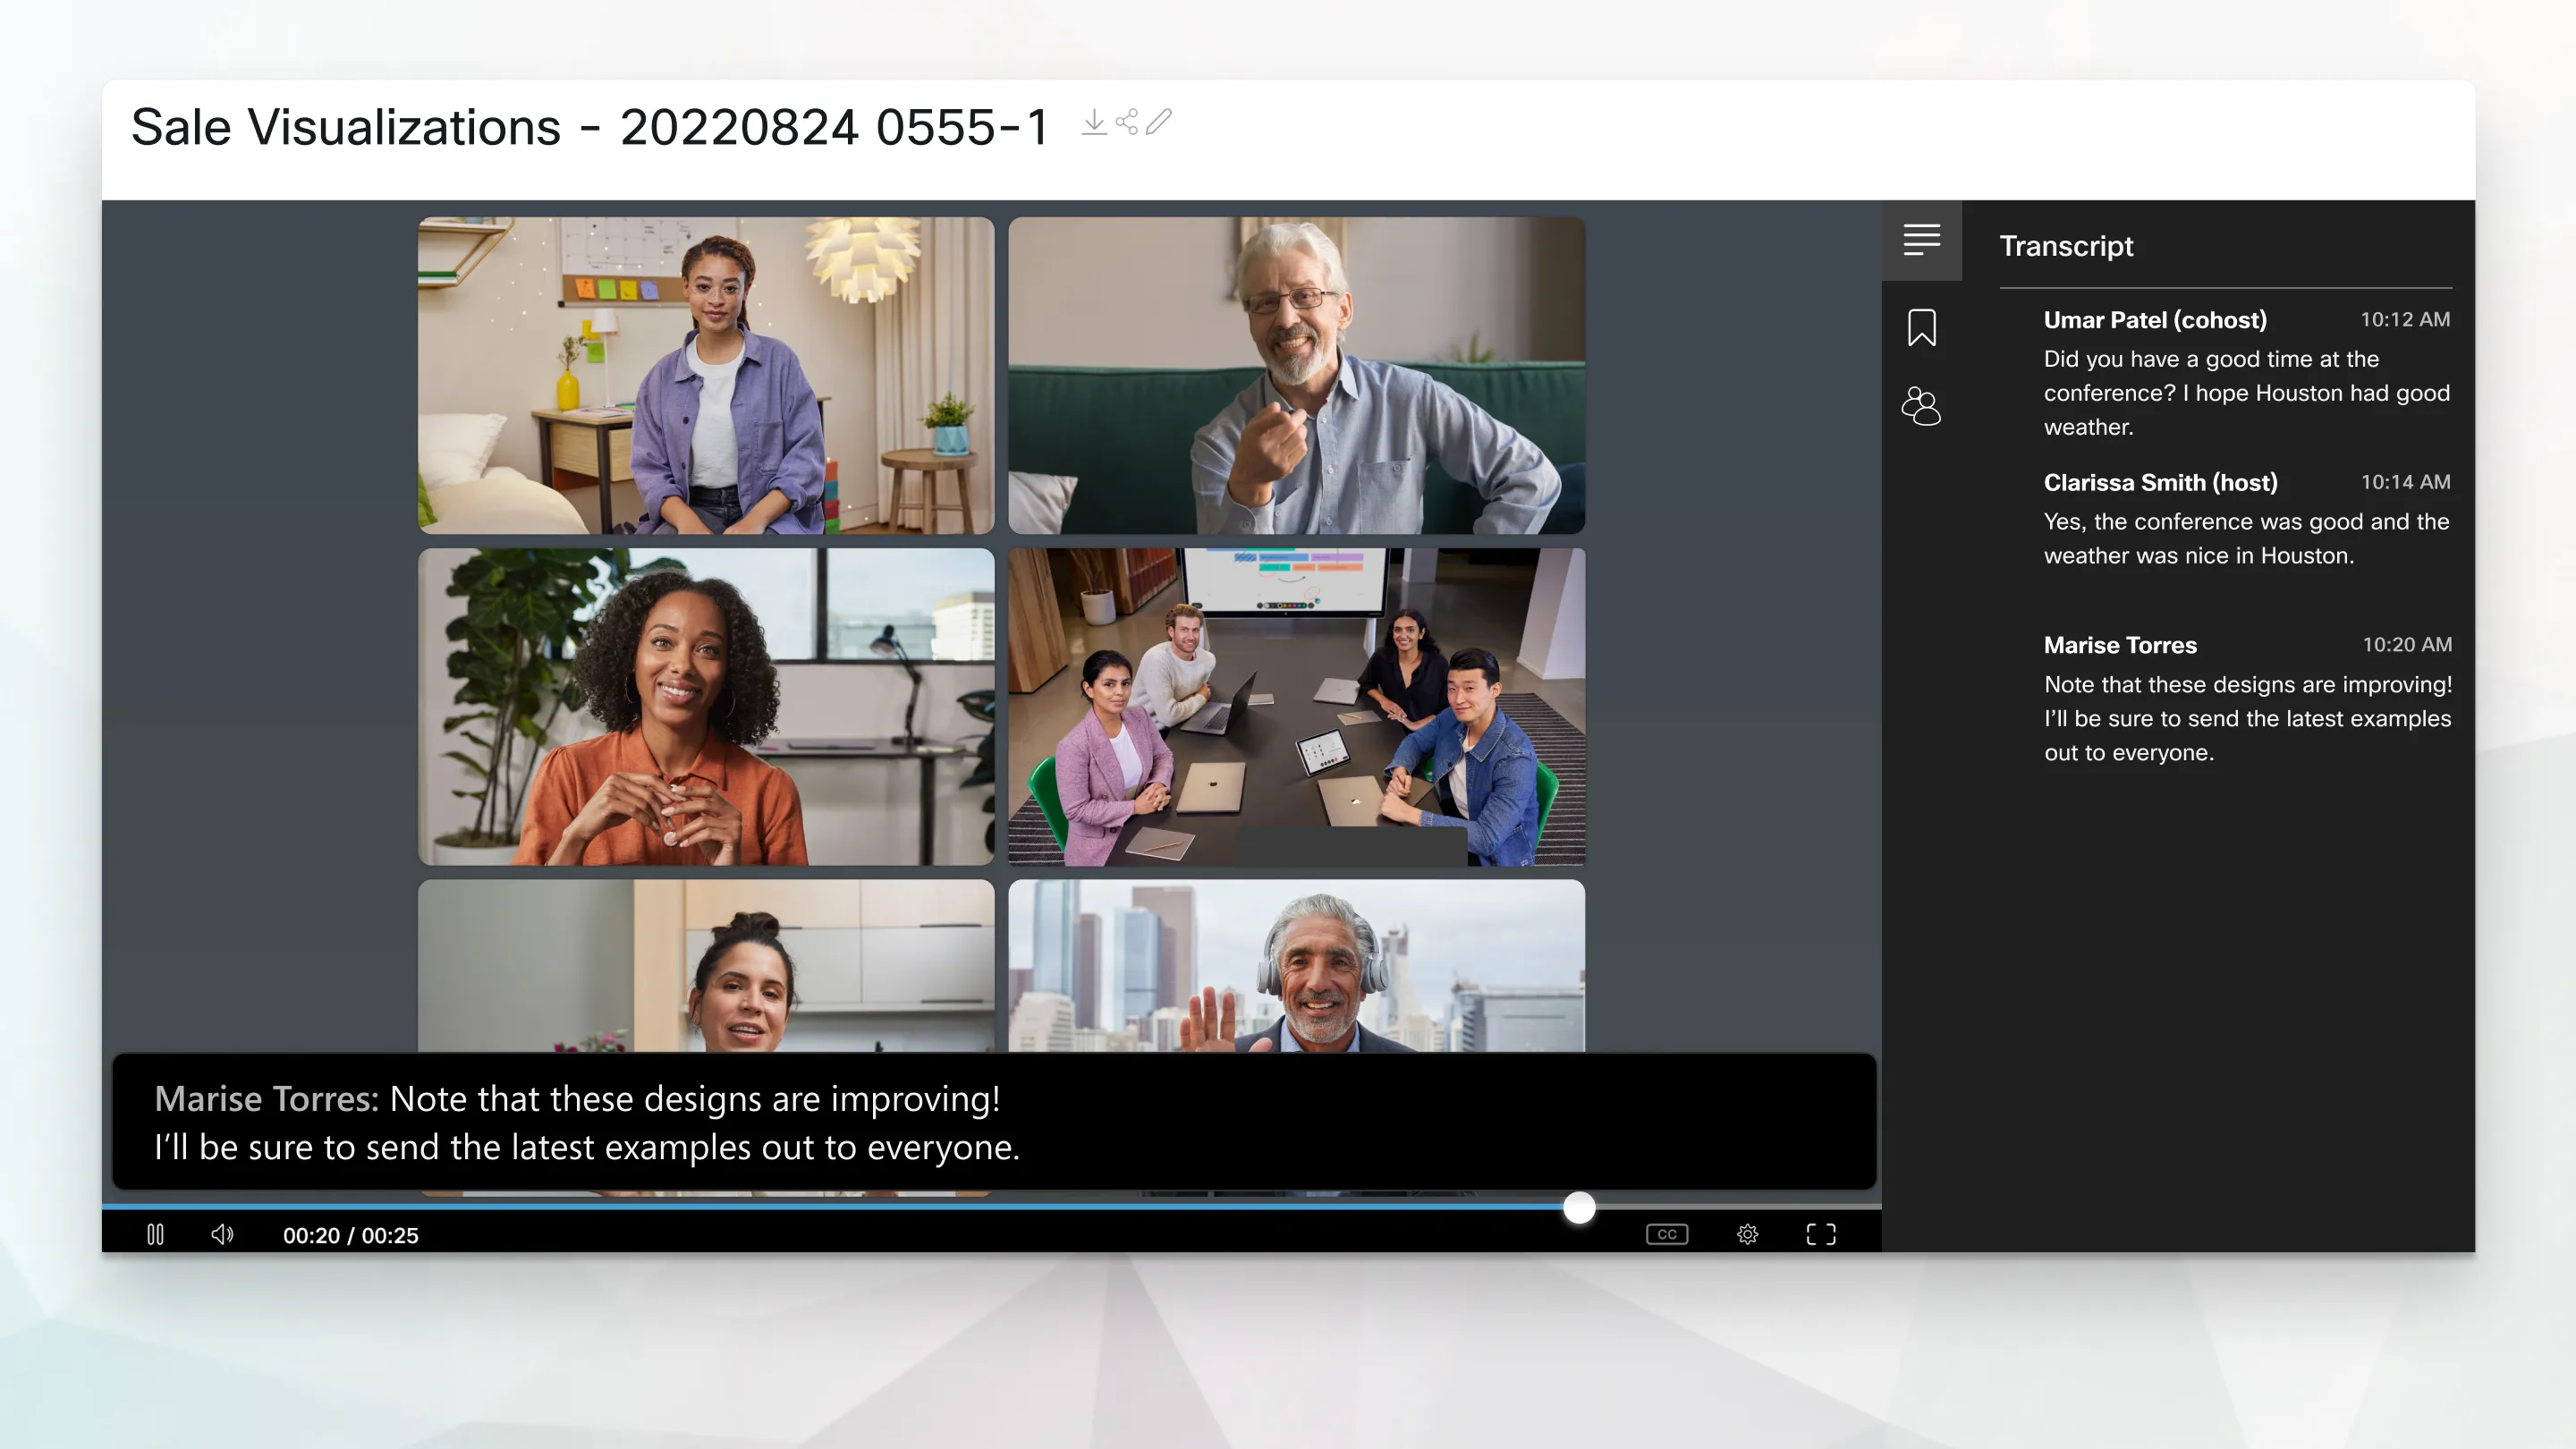
You can:
- Click on any sentence in the transcript to jump to that moment in the video.
- Search for keywords to find key moments faster.
- Edit the text if needed for clarity or accuracy.
You can also download the transcript as a separate file. This is useful if you want to share it with others or add it to meeting notes.
Step 6: Share the recording and transcript
Webex makes it easy to share your recordings and transcripts with your team.
- On the recording page, click Share.
- Enter the email addresses of the people you want to send it to.
- You can control access permissions if needed.
Webex transcription troubleshooting
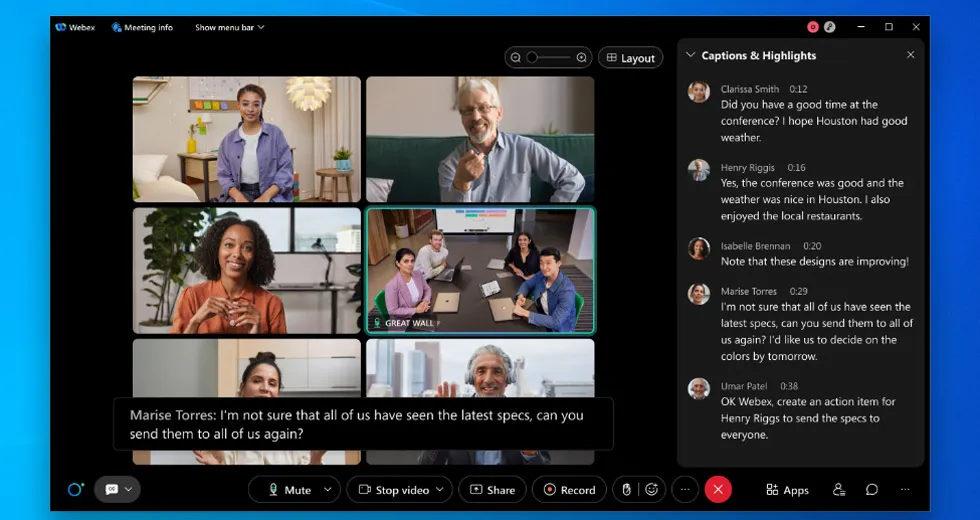
Sometimes, things don’t go as planned. If your Webex transcript isn’t showing up or looks incorrect, don’t worry. Most issues are easy to fix.
Here are the most common problems and how to solve them.
Problem 1: The transcript is missing
You recorded your meeting, but there’s no transcript. This usually means transcription wasn’t enabled.
Start by checking your Webex settings:
- Go to Preferences > Recording.
- Make sure “Create recording transcripts for all my MP4 recordings” is turned on.
If you don’t see this option, your Webex admin may need to enable it for your account. Contact your IT team or admin to confirm.
Also, check how you recorded the meeting. Transcripts are only created for cloud recordings. If you saved the file to your computer, you won’t get a transcript.
Problem 2: The transcript is delayed
You finished your meeting and recorded it in the cloud. But the transcript hasn’t appeared yet.
This is normal. Webex needs time to process your video and generate the transcript. In most cases, it takes up to twice the length of your meeting.
For example, a 60-minute meeting may need 1–2 hours before the transcript shows up. For very long recordings, it can take up to 24 hours.
If it’s been more than a day, and you still don’t see a transcript, contact Webex support.
Problem 3: The transcript is inaccurate
Your transcript is there, but parts of it don’t make sense. Maybe names are wrong or some sentences are garbled.
This usually comes down to poor audio quality. Webex uses voice recognition to transcribe speech, and it needs clear sound.
Here’s how to improve results:
- Use a good microphone.
- Avoid background noise during the meeting.
- Ask speakers to talk clearly and not interrupt each other.
Accents and fast speech can also reduce accuracy. Webex only supports English audio, so if someone is speaking another language or switching between languages, the transcript may be wrong.
Problem 4: You can’t edit the transcript
Webex lets you make edits, but only if the recording is saved in the cloud and transcription is enabled. If you don’t see the option to edit:
- Make sure you’re the meeting host or have been granted permission.
- Open the recording in the Webex portal and look for the transcript panel.
- Click the pencil icon to edit the text.
Still no luck? Check your account permissions or speak to your admin.
Problem 5: Your admin disabled transcription
In some organizations, transcription is turned off by default. If none of the above works, this may be the issue.
Admins control access to transcription features. If your role doesn’t include it, you won’t be able to use it—even if you see the option in your settings.
Talk to your admin and request access. If that’s not possible, you can use a third-party tool like Noota.
Noota offers accurate transcription, even if Webex doesn’t. You’ll also get extra features like meeting summaries and AI highlights.
How to record, transcribe, and summarize a Webex meeting with Noota

Webex transcription works well—when it’s available. But sometimes, you need more flexibility. Maybe transcription is disabled on your account. Maybe you want advanced features like summaries and action items.
That’s where Noota comes in.
Noota is a third-party meeting assistant. It lets you record, transcribe, and summarize your Webex meetings—without needing special permissions. Here's how to use it step by step.
Step 1: Connect your Webex meeting to Noota
Start by visiting noota.io. Create a free account if you haven’t already.
Then, copy the link to your Webex meeting.
- Go to your calendar or Webex dashboard.
- Copy the meeting URL.
Now, paste that URL into your Noota dashboard. You’ll find a clear field to insert your meeting link.
You can also use the Noota Web Extension. It connects directly to your browser, making setup even faster. Once installed, Noota will detect your Webex meeting automatically when it starts.
Step 2: Record the meeting
There are two ways Noota can record your meeting.
- If you're using the link method, Noota’s bot will join your Webex call as a silent participant.
- If you’re using the browser extension, it starts recording and transcribing as soon as the meeting begins.
In both cases, you don’t need to do anything else. Noota handles the recording and live transcription in the background.
No special permissions. No software installation. Just click and go.
Step 3: Access your recording and transcription
Once the meeting ends, Noota uploads everything to your account.
- Log in to your Noota dashboard.
- Open the meeting you just recorded.
- You’ll see a full video, complete transcript, and auto-generated meeting summary.
You can scroll through the transcript, search for keywords, and click on any sentence to jump to that part of the video.
Need to fix a sentence or highlight a key quote? You can edit directly in the platform.
Step 4: Share and summarize
Noota doesn’t stop at transcription. It gives you structured insights from your meeting.
- A full meeting summary
- Key points and decisions
- Action items with assigned names and deadlines
- Speaker identification
You can export this summary or copy it into your CRM, ATS, or project management tool. Just click Share and invite teammates or stakeholders. You control who can view or edit the content.
Want to transcribe and summarize your Webex meetings ? Try Noota for free now.

.png)
.webp)


.svg)
.svg)
.svg)