.png)
.svg)
.svg)
.svg)
Recording your Zoom meetings helps you capture important discussions, and share information with absent team members.
But all these benefits vanish if you struggle to locate recorded sessions !
In this article, we’ll discuss how to locate and access Zoom recordings.
Where Do Zoom Recordings Go?
Zoom recordings can be stored in two locations: either locally on your computer or in the Zoom Cloud. The storage option you get depends on your Zoom account type.If you're using a free account, your Zoom recordings are saved locally on your device.
This means you'll need enough storage space to keep them. However, as a paid account user, you receive more flexibility. You can choose to save your recordings either locally or in the Cloud.Cloud storage allows you to access your recordings from anywhere and saves space.
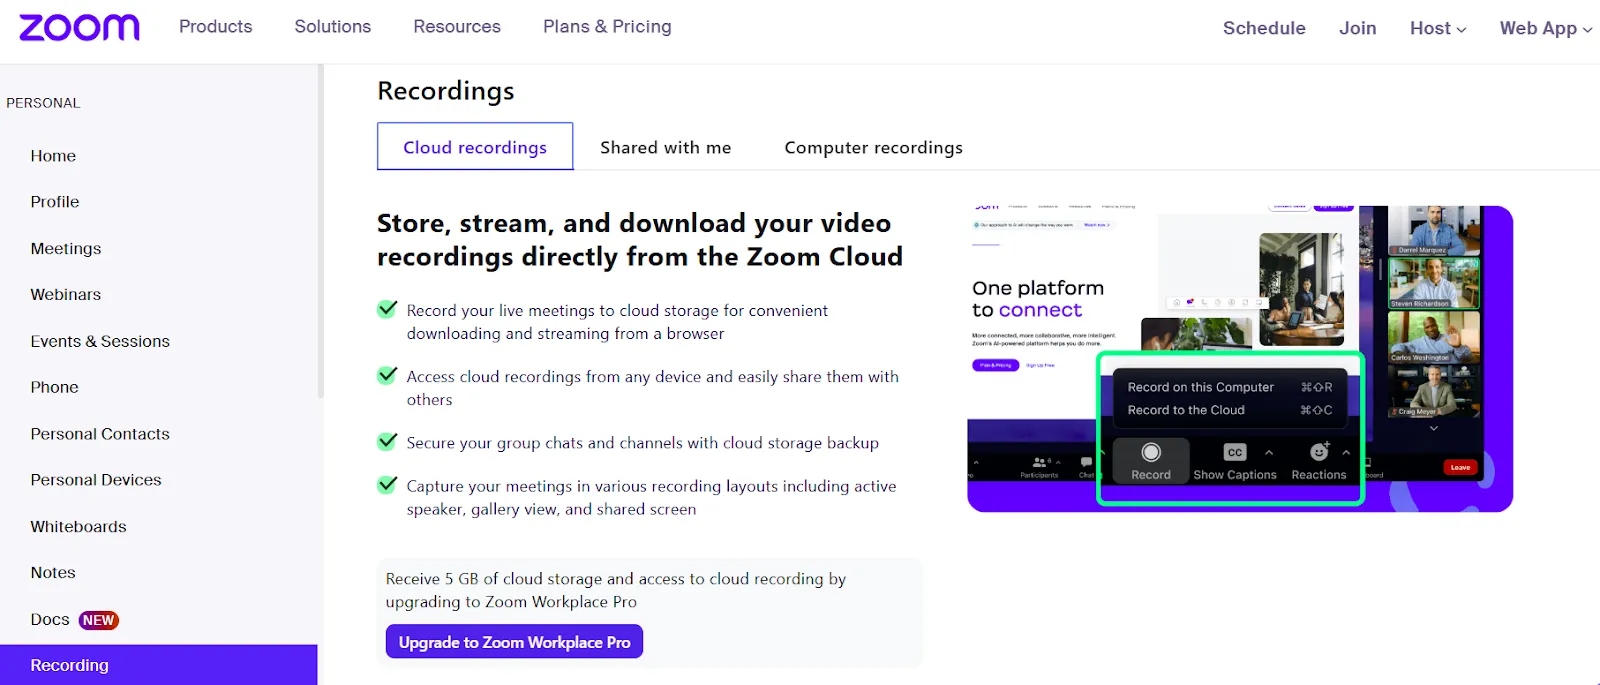
How to Access Zoom Cloud Recordings?
To access Zoom Cloud recordings, follow the steps below:
- Sign In to Zoom: Go to the Zoom web portal and log in with your credentials.
- Navigate to Recordings: In the left-hand menu, click on "Recordings."
- Select Cloud Recordings: Click on the "Cloud Recordings" tab to view your recorded meetings.
- Find Your Recording: Browse through the list or use the search bar to locate a specific recording by meeting ID, topic, or keywords.
- Access the Recording: Click on the meeting topic to open the recording details. Here, you can view the recording.
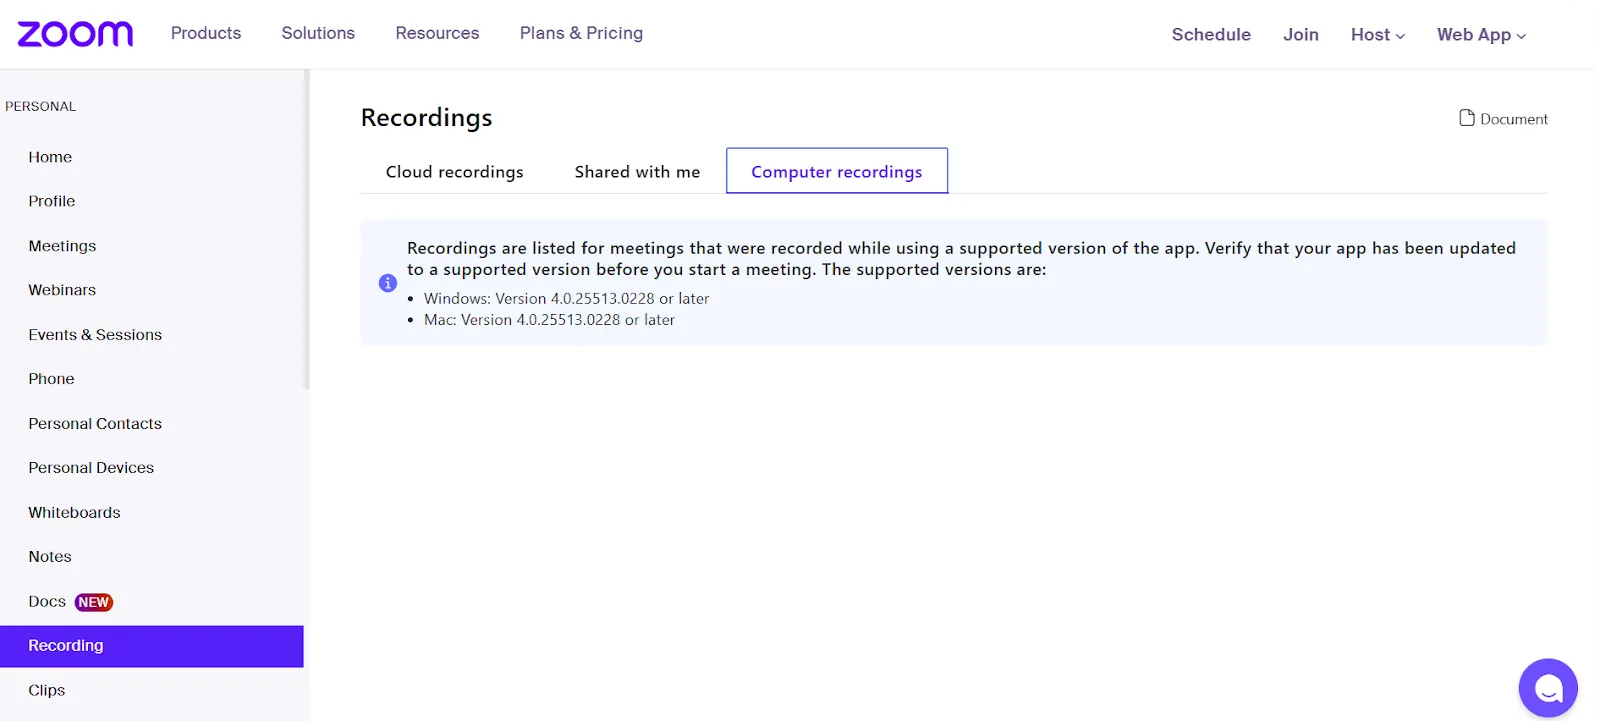
How to Access Zoom Local Recordings?
Finding local recordings is easy and can be done in multiple ways. Here’s how to access them:Via Zoom Web Portal
- Sign in to your Zoom account at zoom.us.
- Click on "My Account" in the top-right corner.
- Navigate to the "Recordings" tab on the left sidebar.
- Under "Local Recordings," you'll see a list of your recorded meetings.
- Click on the meeting title to view or download the recording.

Via Zoom Desktop App
- Open the Zoom desktop application.
- Click on the "Meetings" tab at the top.
- Select the "Recorded" tab on the left.
- Choose the meeting you wish to access.
- Tap "Open" to view the recording folder.
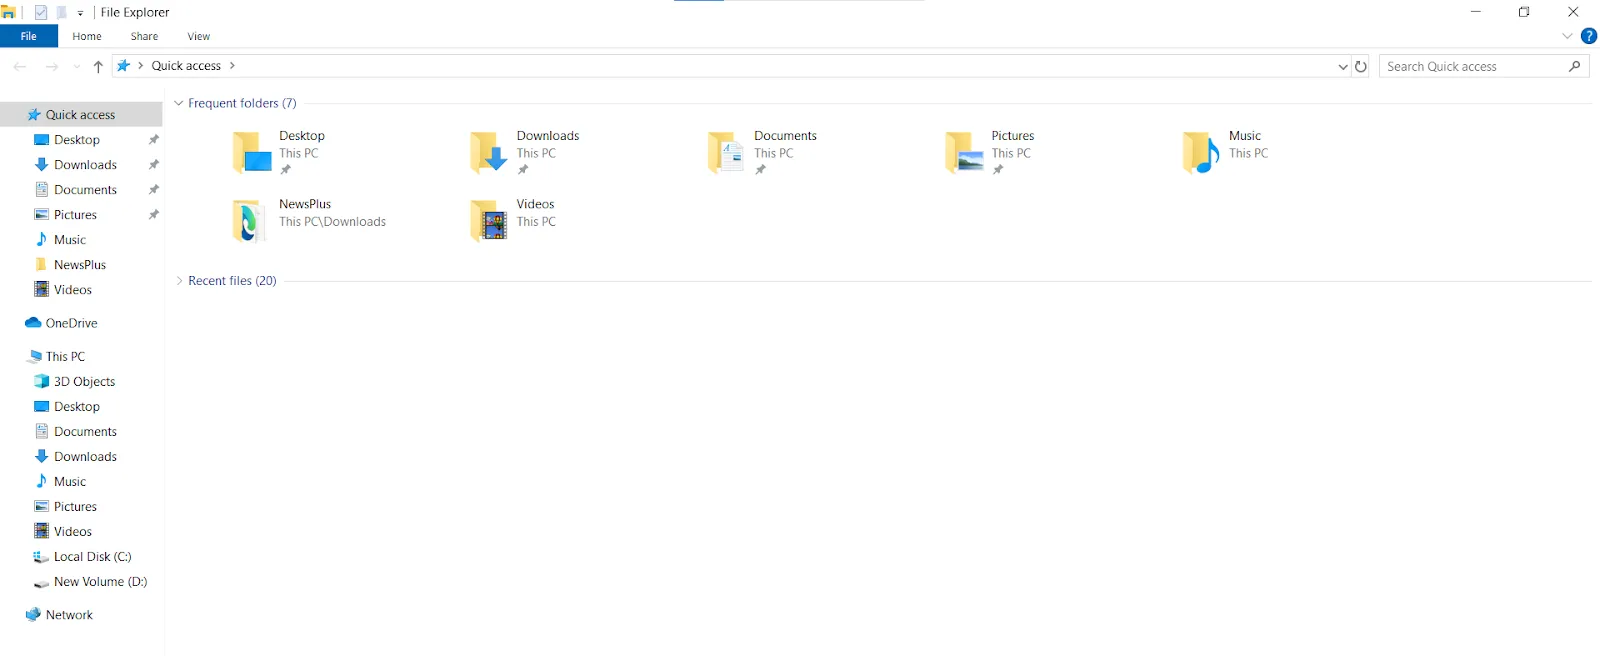
Via Documents Directory
For Windows:
- Click on the File Explorer icon in your taskbar.
- Navigate to Local Disk (C:) > Users
- Locate and click on the folder associated with your username.
- Click on "Documents."
- Open the "Zoom" folder to find your recordings.
For Mac:
- Open Finder icon, which is located in your Mac’s Dock.
- Click on "Documents."
- Open the "Zoom" folder to access your recordings.
For Linux:
- Open your file manager.
- Navigate to your home directory.
- Open the "Documents" folder.
- Locate and open the "Zoom" folder to find your recordings.
Step-by-Step Guide to Finding Zoom Recordings on Mobile Devices
Mobile devices are a great way to access Zoom recordings when you’re on the go. The process is quite easy, no matter whether you’re on Android or iPhone.Here’s how to find Zoom recordings on Mobile:
For Cloud Recordings:
- Open the Zoom App: Launch the Zoom app on your mobile device.
- Navigate to Settings: Tap on "More" (three dots) at the bottom right corner, then select "Settings."
- Access Recordings: In the settings menu, tap on "Recordings" to view your cloud recordings.
For Local Recordings:
Currently, Zoom does not support local recordings on mobile devices. Therefore, any recordings made on your mobile device are stored in the Zoom Cloud.
Alternative Method via Web Browser:
- Open Browser: On your mobile device, open a web browser and go to Zoom's website.
- Sign In: Log in to your Zoom account.
- Access Recordings: Click on "Recordings" in the left-hand menu to view your cloud recordings.
How Can You Access Zoom Recordings Shared by Others?
If you want to view Zoom recordings shared by others, follow these steps:
- Receive the Shareable Link: The meeting host or participant who recorded the session can share a link with you. This link grants you access to the recording.
- Open the Link: Click on the shared link. It will direct you to the Zoom web portal, where you can view the recording.
- Enter Passcode (If Required): Some recordings may require a passcode. If prompted, enter the passcode provided by the host or participant.
Note: Access to Zoom recordings depends on the permissions set by the meeting host or the person who started the recording. If you encounter any issues accessing the recording, contact the host or participant for assistance.
Changing the Default Save Location for Local Recordings
By default, Zoom saves local recordings to your computer’s “Documents” folder. However, you can change this location to better organize your files or store them on a different drive.Here’s how to change the save location for local recordings:
- Open the Zoom desktop client and click on your profile picture in the top right corner.
- Select “Settings” from the dropdown menu.
- In the Settings window, click on the “Recording” tab.
- Under the “Local Recording” section, click “Change” next to the "Store my recordings at" option.
- Choose a new folder location on your computer and click “Select Folder” to confirm.
Sharing Your Zoom Meeting Recordings
Now that you’ve accessed your Zoom recordings, it’s time to share them with your team. Here’s how to do so:
For Cloud Recordings
- Sign in to the Zoom web portal.
- In the navigation menu, click on "Recordings."
- Click on the "Cloud Recordings" tab and choose the meeting you wish to share.
- Click the "Share" button. You can copy the shareable link and send it via email or chat.
Additionally, you can adjust sharing settings, such as requiring a passcode or limiting access to specific users.
For Local Recordings
- Locate the recording you want to share and copy it.
- Upload the file to a cloud storage service like Dropbox.
- Once uploaded, generate a shareable link and send it to your intended recipients.
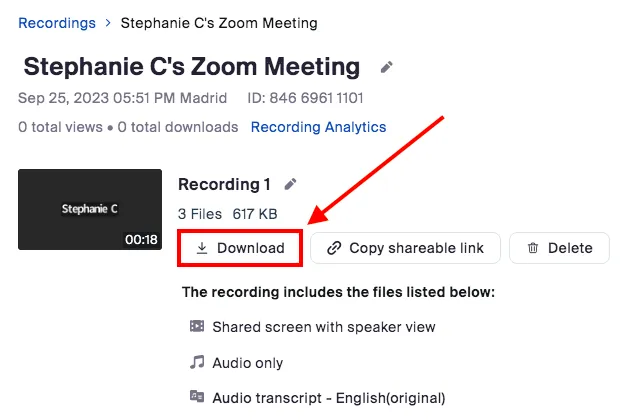
Downloading Cloud Recordings
Want an offline version of your Zoom Cloud recording? In that scenario, follow these steps:
- Go to the Zoom web portal and log in with your credentials.
- In the left-hand menu, click on “Recordings.” Then, select the “Cloud Recordings” tab to view your recorded meetings.
- Browse through your list of recordings and click on the meeting you wish to download.
- On the recording page, tap the “Download” button next to the video file you want to save. A confirmation prompt will appear; click “Download” to confirm.
Seamless Meeting Zoom Documentation : Noota
Now that you’ve got your Zoom recordings, utilize Noota to turn them into more than just a playback. This AI-driven tool turns your meetings into detailed scripts, concise summaries, and key insights, making your meetings more productive and insightful.
- Accurate Transcriptions: Noota records conversations and automatically transcribes them with high accuracy, ensuring that nothing is missed during meetings. This helps you focus on the conversation rather than worrying about manual note-taking.
- Summarization and Key Points: After the meeting, Noota generates concise summaries, highlighting key takeaways. This makes it easier to review meetings without having to listen to the entire recording.
- Speaker Identification: Noota can distinguish between different speakers, making it clear who said what during the meeting. This is especially useful for reviewing detailed discussions or actions assigned to specific individuals.
- Integrate Seamlessly with Your Workflow: Noota AI integrates effortlessly with the CRM or task management systems you already use. It ensures a more efficient workflow.
Want to transform your Zoom sessions into actionable, searchable insights? Try Noota for free.
(FAQs)
How long does a Zoom recording take to process?
Zoom recordings typically take anywhere from 5 minutes to an hour to process, depending on the length and size of the recording. Longer meetings or recordings with many participants may take more time, and you'll receive an email once processing is complete.
Is it better to record Zoom on local computer or cloud?
Recording on the cloud is convenient for easy access and sharing, and it’s automatically backed up. However, local recordings give you more control over file size and storage. Choose cloud if you need access from multiple devices or plan to share the recording frequently.
How long do Zoom recordings stay available?
Cloud recordings are stored for 30 days by default, after which they are deleted unless manually extended. Local recordings are saved on your computer, with no time limit, but you must manage storage. It's essential to back up cloud recordings if you need them longer than 30 days.
.webp)


.svg)
