.png)

.svg)
.svg)
.svg)
Most Teams recordings end up forgotten because editing them feels like too much work.
But what if you could automate the entire process—from trimming the video to generating meeting summaries and follow-up emails?
This guide will show you exactly how to edit your Teams recordings, whether you’re using Teams’ built-in editing features, or an external tool.
How to Edit a Recording with Teams' Built-in Features
Microsoft Teams provides a simple way to record, store, and share meetings, but its built-in editing tools are limited. Here’s how to use them :
1. Accessing Your Teams Recording
Where your Teams recording is stored depends on your organization’s setup:
- For Standard Meetings: Teams recordings are stored in OneDrive for personal meetings and in SharePoint for channel meetings.
- For Webinars or Large Meetings: The recording is typically stored in Microsoft Stream for company-wide access.
To locate your Teams recording:
- Open Microsoft Teams and navigate to the meeting chat or channel.
- Click on the recording link, which redirects you to OneDrive, SharePoint, or Microsoft Stream.
- Download the recording if you want to edit it with external software.
2. Trimming a Teams Recording in Microsoft Stream
Microsoft Stream allows you to make basic trims to the beginning and end of your recording. Follow these steps:
- Open Microsoft Stream in your web browser.
- Click on "My Content" > "Videos" to find your recording.
- Select the video you want to edit and click the More actions (···) button.
- Choose "Trim video" from the dropdown menu.
- Drag the handles on the timeline to select the portion of the video you want to keep.
- Click Save to apply your changes.

This tool is helpful for cutting out dead air at the start and removing irrelevant sections at the end.
3. Limitations of Teams’ Built-in Editing Features
While Microsoft Stream provides a quick trimming option, it lacks many essential editing tools:
- No Ability to Cut Sections in the Middle – You can only trim the start and end.
- No Text Overlays or Annotations – You cannot add subtitles, notes, or highlights.
- No Audio Enhancements – Background noise reduction or voice adjustments require external software.
If you need more control over your Teams recordings, you’ll need to edit them on PC, Mac, or mobile using advanced software like iMovie, Adobe Premiere Pro, or AI-powered tools like Noota.
How to Edit a Teams Recording on PC/Mac
To edit your Teams recording effectively, you can also use a dedicated video editor on your Windows PC or Mac. Below, we’ll cover how to do it :
1. Locating Your Teams Recording
Before you can edit your Teams meeting recording, you need to find where it’s stored.
- For OneDrive (Personal & Scheduled Meetings):
- Open OneDrive on your PC or Mac.
- Navigate to "My Files" > "Recordings" to find your Teams recordings.
- For SharePoint (Channel Meetings):
- Open SharePoint and go to your team’s channel.
- Click on "Files" > "Recordings" to locate your meeting file.
- For Microsoft Stream (If Used by Your Organization):
- Open Microsoft Stream in a web browser.
- Go to "My Content" > "Videos" to view and download your recording.
Once downloaded, you can start editing it using your preferred video editing software.
2. Editing a Teams Recording on Windows
Using Windows’ Built-in Video Editor (Free, Basic Editing)
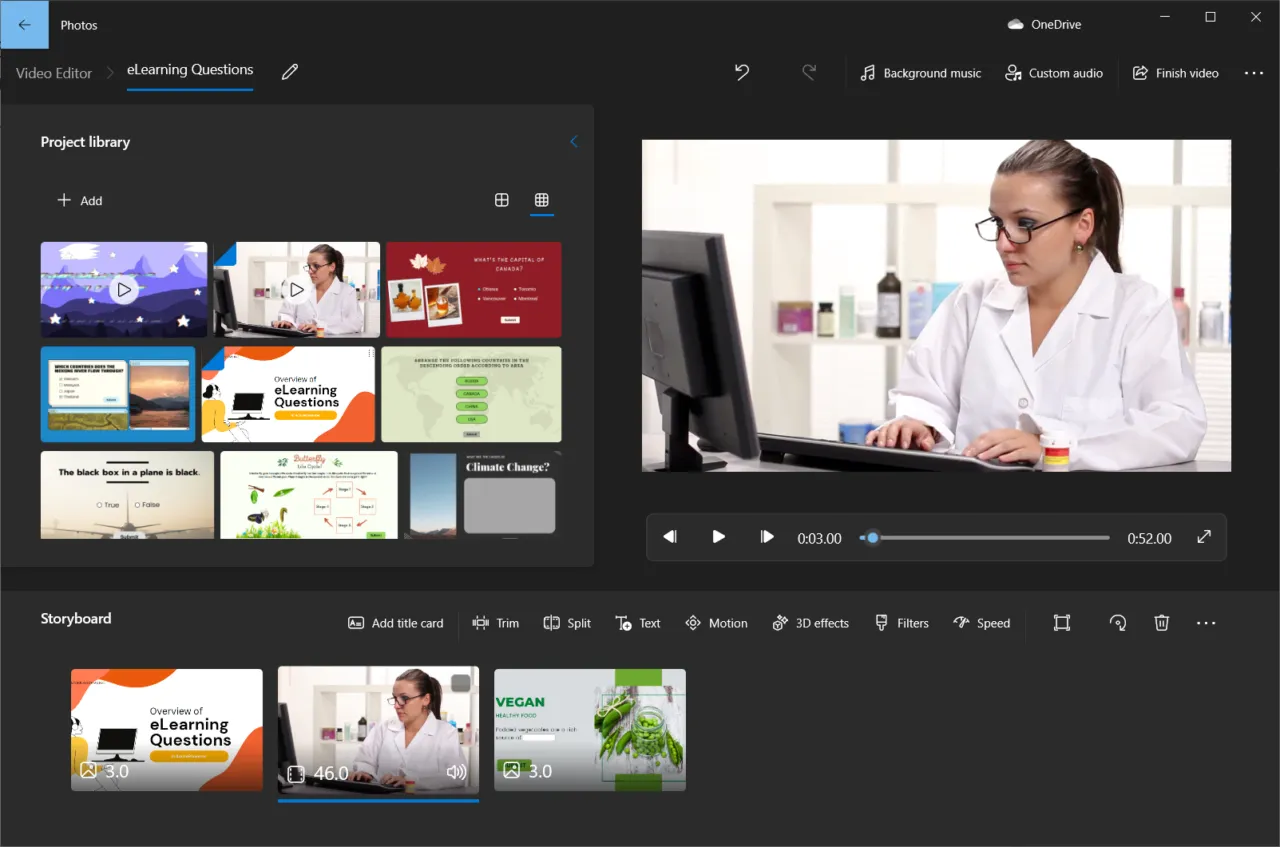
If you only need simple trimming and minor adjustments, the built-in Photos app (Windows 10 & 11) has a hidden video editor:
- Open Photos and click "Video Editor".
- Create a new project and import your Teams recording.
- Use the Trim tool to remove unnecessary parts.
- Add text captions or transitions if needed.
- Export your edited video in MP4 format.
While this is a free and easy solution, it lacks multi-track editing and audio enhancements.
Using Advanced Editors (Adobe Premiere Pro or DaVinci Resolve)
For professional editing, consider:
- Adobe Premiere Pro (Paid) – A high-end editor for cutting, merging, and adding effects.
- DaVinci Resolve (Free & Paid) – A powerful tool with color correction, multi-track editing, and AI-enhanced audio balancing.
To edit your recording:
- Import your Teams recording into the timeline.
- Cut unnecessary sections or add transitions.
- Adjust audio levels to improve clarity.
- Export the video in your preferred resolution.
These tools are ideal for professional-grade video editing.
3. Editing a Teams Recording on Mac
Using iMovie (Free, Ideal for Quick Editing)
Mac users can edit Teams recordings easily with iMovie, which offers:
- Simple trimming and cutting tools.
- Options to add text, transitions, and background music.
- A user-friendly interface with drag-and-drop functionality.
To edit in iMovie:
- Open iMovie and start a new project.
- Drag your Teams recording into the timeline.
- Trim, cut, or adjust the audio levels.
- Export in MP4 or MOV format for easy sharing.
For more advanced editing, Mac users can use Final Cut Pro, which supports multi-track editing, motion graphics, and color grading.
How to Edit a Teams Recording on Mobile
Editing a Microsoft Teams recording on a mobile device is a convenient option for those who need to make quick edits on the go. In this section, we’ll guide you through how to locate your Teams recording and the best apps to edit it on your smartphone or tablet.
1. Locating Your Teams Recording on Mobile
Before you begin editing, you need to access your Teams recording.
- For OneDrive (Personal & Scheduled Meetings)
- Open the OneDrive app on your phone.
- Navigate to "My Files" > "Recordings" to find the file.
- For SharePoint (Channel Meetings)
- Open the Microsoft Teams app.
- Go to the channel where the meeting took place and open "Files" > "Recordings".
- For Microsoft Stream (If Enabled by Your Organization)
- Open the Microsoft Stream app or web version.
- Navigate to "My Content" > "Videos" to download your recording.
Once downloaded, the video will be saved in your phone’s gallery or file manager, ready for editing.
2. Editing a Teams Recording on iPhone (iOS)
Using iMovie (Free, iOS Only)
Apple’s iMovie is a user-friendly editing tool available for iPhones and iPads.
- Open iMovie and tap “Create a New Project”.
- Select your Teams recording from your Photos or Files app.
- Use the Trim tool to remove unwanted sections.
- Add text overlays, transitions, or background music if needed.
- Tap Export and choose your preferred resolution and format.
✅ Pros:
- Free and pre-installed on iOS devices.
- Easy-to-use interface with drag-and-drop functionality.
❌ Cons:
- Limited advanced editing features.
- Cannot fine-tune audio or add multiple video layers.
3. Editing a Teams Recording on Android
Using InShot (Free & Paid, Android & iOS)
InShot is a popular mobile editing app that provides basic and advanced editing tools.
- Open InShot and tap “Video”.
- Import your Teams recording from your phone’s gallery.
- Use the Trim tool to remove unwanted parts.
- Add filters, text, and background music if needed.
- Save and export your video in MP4 format.
✅ Pros:
- Simple and intuitive interface.
- Works on both Android and iOS.
❌ Cons:
- Free version includes a watermark.
- Lacks professional-grade features.
Using Kinemaster (Advanced Editing for Android & iOS)
For more advanced mobile editing, Kinemaster offers a multi-layer timeline and professional features.
- Open Kinemaster and start a new project.
- Import your Teams recording from OneDrive or phone storage.
- Trim, cut, or split clips as needed.
- Adjust audio levels and reduce background noise.
- Export in HD or 4K resolution.
✅ Pros:
- Advanced features like multi-layer editing.
- High-quality export options.
❌ Cons:
- Free version includes watermarks.
- Slight learning curve for beginners.
How to Edit a Teams Recording with AI: Noota
Manually editing a Microsoft Teams recording can be time-consuming and inefficient.. But with AI-powered tools like Noota, you can automate the editing process :
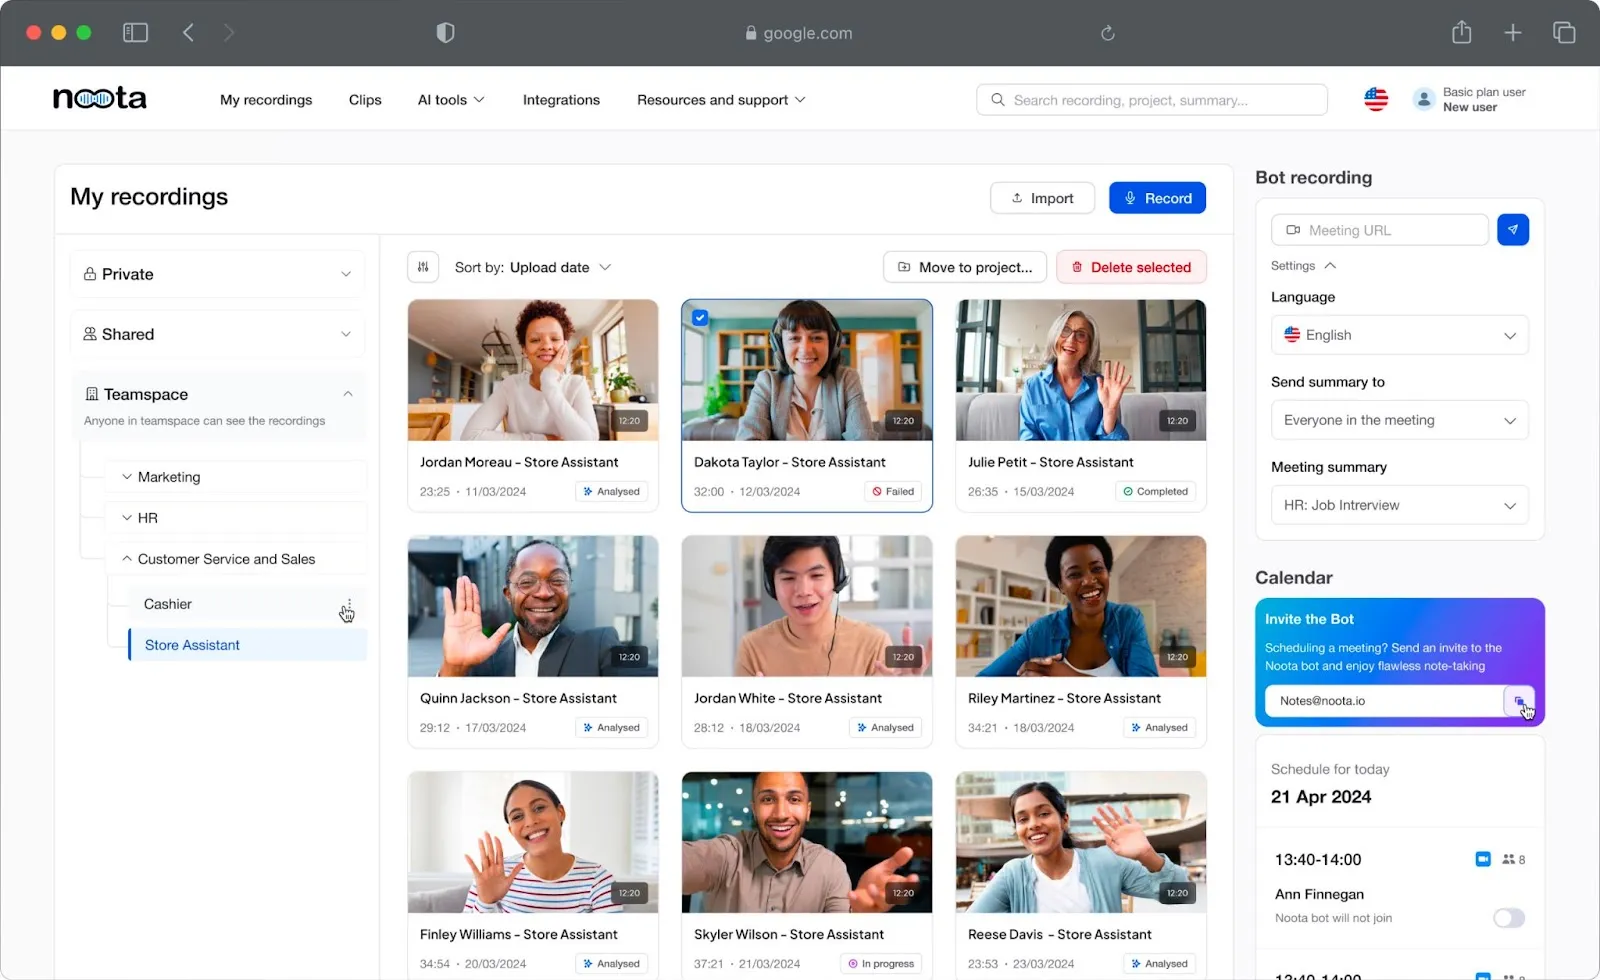
1. Upload Your Teams Recording to Noota
To get started, you need to upload your Teams recording to Noota’s platform:
- Sign in to your Noota account.
- Click “Upload” and select your Teams recording from OneDrive, SharePoint, or your local storage.
- Noota will process the video automatically, converting the audio into a fully searchable transcript.
Once uploaded, Noota’s AI starts analyzing the content, detecting speakers, important topics, and action items.
2. Automatic Transcription for Easy Navigation
Instead of replaying the entire meeting to find key points, Noota provides an AI-powered transcript that lets you search for specific topics, decisions, or action items instantly.
- Speaker Identification: Each speaker is automatically labeled, making it easy to track who said what.
- Timestamped Text: Every part of the conversation is linked to its exact moment in the video.
- Editable Transcript: You can modify the transcript if needed before exporting or sharing it.
This feature allows you to cut down unnecessary content, focus on key moments, and summarize meetings in minutes instead of hours.
3. AI-Generated Video Clips for Fast Editing
With Noota, you don’t have to manually trim your video—the AI does it for you by extracting key moments from the recording.
- Predefined Templates: Choose from different templates for client meetings, team updates, or project briefings.
- Smart Highlights: Noota identifies critical discussions, decisions, and follow-ups and automatically clips them.
- Customizable Clips: Adjust timestamps, add captions, or refine selections for a polished final version.
This feature is perfect for creating shareable video summaries or cutting out unnecessary discussions while keeping the most relevant parts.
4. Turn Your Recording into Actionable Documents
Editing isn’t just about cutting a video—it’s about making the content useful. Noota converts your Teams recording into structured reports that can be shared instantly.
- AI-Generated Meeting Summaries: Automatically extracts key takeaways, eliminating the need for manual note-taking.
- Instant Meeting Minutes: Generates clear, formatted minutes with decisions, action items, and next steps.
- Automated Follow-Up Emails: Noota drafts professional follow-ups based on the conversation, making post-meeting communication effortless.
Want to manage your Teams recordings efficiently ? Try Noota for free now.
.webp)


.svg)
